Encrusted CQ class project

Encrusted CQ class project

Thursday, 25 August 2011

What Do I Do With It? - A Tutorial (Part 2)

And now, on to part two.

Here is an example of what you will get in one of the 100 piece vintage embellishment packs - available at reclamationtextiles.etsy.com   I think you will agree they are a great deal at $10. plus shipping per pack!


Remember that every pack is different, so you can't order this exact pack, but you can order something similar in the lilac/purple/silver colorway.  This pack contains a crocheted doily and a cotton napkin with lace edging, both of which I hand-dyed.  There is a piece of wired taffeta ribbon, lots of beads and buttons and sequins, some embroidery threads, 3 artificial flowers, and a piece of silver satin trim, which was the placket of a thrift-store blouse.  

And here's a closer look at the beads, buttons and sequins:


Most of the items in these packs are vintage, and I only include items that have the vintage look - no contemporary-looking fabrics, pony beads, etc.  I have seen crazy quilt pieces that look Shabby Chic/Victorian - EXCEPT for the shiny plastic buttons or one unfortunate fabric choice.  It can ruin the whole aged, vintage look.  

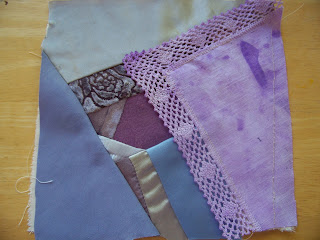
Here is the pieced block from my last post, and you can see I have already added a corner of the cotton napkin.


Just a quick aside here:  I love vintage linens and respect the work that went into them.  You may think it's rather cruel of me to cut up these lovely old things.  First of all, I wouldn't cut up something truly old and valuable.  But most of the items I find are in garage sales and thrift stores, and not always in perfect shape.  I buy the napkin with stains, the tablecloth with holes and tears in it, the small pieces of hand-made lace and prevent them from going to a landfill.  Some items can be repaired or dyed to cover small imperfections, other times, I just cut away the damage and keep the useful part.  So, I know it seems harsh the first time you cut into a crocheted doily - but press on, and soon you will be hacking apart old wedding dresses, since they won't we worn again anyway, and you can make one or several beautiful works of art from the salvaged material.

Back to the block - I find it best to piece the block, embroider the seams (I usually embroider every seam) and add the beads, buttons and charms last.  If you add buttons and try to embroider afterwards, you will inevitably catch your thread on the buttons, which caused tangled thread and a wee bit of bad language.

So, I embroider the seams first, using the threads in the embellishment pack.  There are lots of hand embroidery resources at the library and online - I have an embroidery app for my iPhone and I also use the stitch dictionary at inaminuteago.com  Oops, almost forgot to tell you.....before I begin embellishing, I measure out the design area of 6", mark it with chalk and then baste a contrasting color thread around it.  This will help me keep the stitching, buttons and beads away from the seam line, which will prevent more of the aforementioned bad language when I finish the block.

And here's how it looks with embroidered seams and some added ribbon and parts of the doily:


It's starting to look quite different now, isn't it?

Lastly, I add buttons, beads, sequins, charms - the sky's the limit on what you can add.  For this example, I'm using only items from the embellishment pack, with the exception of a bit of variegated purple DMC floss I already had.


To use the fabric flower, just remove the plastic piece from the middle and stitch the petals down.  I added seed beads for the centre of the flower.  Just to the left of center, with a lovely silvery purple button on it, is the original 5-sided shape that started the whole process.

And here's everything that's left over from the embellishment pack:


And with that, I am taking a break from blogging for a couple of weeks.  My Etsy shop will be closed September 1 to 9;  then I'll be back creating, photographing, listing and blogging.  See you in a couple of weeks!

What do I do with it? - A Tutorial

I am stocking a new item in my Etsy shop - 100 Piece Vintage Embellishment Packs - in a variety of colors.  My husband suggested I do a blog post on what someone would do with one of these packs.  Since he's usually right (there, I said it....), I am going to attempt to photograph basic crazy quilt piecing and also how I would use one of these embellishment packs.

So - basic CQ construction.  First, I have to say that the main rule of crazy quilting is that there are NO RULES, so my way is just one of many.  You can search on the internet for different ways to piece if mine doesn't work well for you.

Second - I learned this method of piecing from a video by Judith Baker Montano.  She is a long-time CQ artist, originally from Alberta and now living in the US.  She has written some excellent  books, and her website is judithbakermontano.com  

For this example, I will be making a 6 1/2" square, which, when sewn to another square or stitched down onto a tote bag, will finish to 6" square.  I begin with a 7" square of muslin, to allow for "shrinkage" as I stitch down the fabrics on top.  I used to make my base square several inches bigger on all sides, but that meant I'd end up trimming away and wasting too much fabric.  1/4 - 1/2" all around is all you need.  If you don't have muslin, an old white or ivory sheet or pillowcase would work.  Cotton is preferable, as polyester in the base fabric is a little rougher, and can shred your embroidery thread later.  If you have ever done any kind of quilting, you'll know that you only use a 1/4" seam allowance (garment sewing is usually 5/8").  One quarter inch is about the width of your sewing machine's presser foot, which is kind of a nice coincidence, now isn't it?

The first piece of fabric is 5-sided, like a lopsided house.  I place it slightly off-center on the muslin, right side up.

Sorry about the blurry photo.......

I pin the next piece of fabric, right sides together, along any of the sides of the pentagon.


I stitch down the second fabric, using a slightly longer stitch length than normal.  Notice I do not backspace or lockstitch at the beginning and end of the seams.  Often you need to clip a few stitches later, when trimming fabrics.  The longer stitch length and no backstitching makes it easy to lift up the fabric and nip the stitches where necessary.


Next, I trim away excess seam allowance to prevent bulkiness when hand-stitching later.  I press the seam, first pressing just as I've sewn it, then flipping the second piece over, and pressing well.  You want to keep the piecing as flat as possible at all times.  The iron is your friend!


I like to work counter-clockwise in my piecing.  You can work either direction, just pick one direction and consistently go that way to prevent awkward L shapes and other piecing problems.  Here I have turned the piece and pinned on a third piece of fabric, right sides together.


Here's the third piece stitched down, needing a trim.


Trimmed, flipped and pressed.  Are you starting to see how this works?  Basically you continue piecing until you have completely covered and slightly overlapped the edges of the muslin.  But sometimes the seams can get a little long, and I don't like it to look bigger and bigger as it extends to the edges.


 But sometimes the seams can get a little long, and I don't it to look bigger and bigger as it extends to the edges.  So, piece two or more fabrics together and use them as a unit for the next addition to the block.


Basically you continue piecing until you have completely covered and slightly overlapped the edges of the muslin. 

And here's the finished block, pressed and trimmed.


Stay tuned for my next post:  The 100 piece vintage embellishment pack and how to use it on a CQ block!

Saturday, 20 August 2011

Black and brights quilt


This week I began working on a wall quilt with a color scheme I haven't tried before.  I've seen pictures on flickr.com of mourning quilts, which were traditionally in shades of grey and black.  One quilt, though, had a contemporary variation of a mourning quilt.  In each block, there was one brightly colored piece of fabric, and the embroidery and embellishments were also in various bright colors, which really "popped" against the dark tones.  I am planning to make 9 of these blocks, with one accent color in each block.  This small quilt will be for sale in my Etsy shop - reclamationtextiles.etsy.com  

I used a lot of repurposed fabrics in the blocks so far - fabric scraps and clothing from thrift stores, including a man's tie and a vintage dress.  The buttons are a variety of new and vintage.  

Here are the first 5 blocks:


 The center fabric in the turquoise block has a satin ribbon running down the middle, which caused a glare when photographed.


And here's a close-up of the purple block.  I just love the Scotty dog button, and the lilac swirl button below it reminds me of candy.


Just 4 more blocks to go, then I'll need to make some decisions about whether to add sashing strips in between the blocks, or just stitch the blocks together.  Border or no border?  As usual, I am figuring out the design as I go along.  I'll keep you updated on my progress!

Sunday, 7 August 2011

Things I'm Working On

 This week I have been working on some patchwork-covered journals.  I'm sure I'm not the only one who keeps a notebook in her purse all the time; for shopping and to-do lists, art ideas and inspiration.  And who wants a plain old notebook when you can have a little bling?

Woven batiks and a few beads:

Random strips and squares in blues and greens:


And here's the back view:


This is one of my favorites so far - pastel batiks, buttons and rhinestones:


A close up of the buttons:


And the back view:


Another small journal featuring a filigree flower.  The flower was originally a brooch but the backing was broken off when I bought it.  I've been hanging onto it for months, knowing I'd find the perfect place for it!

Some of these notebooks will be going in my Etsy store - reclamationtextiles.etsy.com and I may put one on eBay.  I'm also currently working on Christmas ornaments for dog and cat lovers, a steampunk Christmas ornament, a unique jewelry idea, and more.....  So many ideas, so bad at time management!  I haven't worked on the Under The Sea piece for a couple of weeks - I am feeling "stuck" and need to work the problem out in my head before I continue.  I'm not happy with the sky fabric - I need to either add a sheer layer on top to tone down the color, or rip it out and replace it with something calmer.  I am pondering the best way to fix this problem, and I'm sure the answer will come one day soon, and I'll get back to stitching on that.  

*Basement Update:  The restoration company came in and removed all the flooring downstairs.  Three huge fans have been drying things out and I am hoping we can choose new flooring soon.  I really want to get my house back to some semblance of order, but it sounds like the insurance companies and restoration people are busy all over Alberta with the stormy summer weather, and ours is one of many, many wet basements.  So we wait.

In the meantime, I'm off to reboot the laundry and plan this week's creative projects!  Happy stitching everyone!

Monday, 1 August 2011

Flooded basement and a block comes home


Well, last week was certainly eventful.   Our hot water tank developed a leak and I spent several days fighting a losing battle to keep the water from damaging anything.  All the flooring will need to be replaced, after the restoration company brings in fans and dehumidifiers to dry things up.  We had to remove everything from the basement, which forced us to declutter a lot of things that we should have gotten rid of ages ago.  In the end we'll have new flooring and an almost empty basement, but oh, the sore muscles from moving all that stuff......   Do you have homeowner's or renter's insurance with replacement cost of your contents?  Insurance is cheap when compared to not having it when "life happens".

Amid this stressful and busy week, my "Half and Half" round robin block arrived home.  Here is the burgundy and dark green block as I sent it out:  


And here's what it looks like now!


A couple of close ups - first feast your eyes on Ruby's silk ribbon work and a bias tube flower in the center.  I've never seen anything like it, and it adds so much dimension to the center of the block.
Lynn added lots of beads to the block - and I love beads and buttons!!

I photographed my hand in this picture so you could see the size of Amber's teeny perfect stitches in those bullion roses - I am blown away!

Thank you ladies, for your beautiful work on my block.  It came at the end of a very stressful week, and cheered me up immensely.  

I am hoping to get back to some stitching this week, and listing more items on eBay and my Etsy shop - reclamationtextiles.etsy.com  

See you soon, and happy stitching!