Dear Reader -
I come to you today with a question. Is there still such a thing as Women's Work? I'll explain how I came to ask this question, and then I'd love your take on this.
It's the first month of my alterations business. After a very nice article in our local newspaper, business has really picked up, and my shop is busy. Orders are coming in, and people are making inquiries by phone and email. I have had mostly good experiences, and met some lovely people. I have met my real customers and I like them!
I have also talked to a few older ladies who think that my pricing is much too high, and take that as justification to yell at me and scold me. There is at least one older lady in town who has been sewing for years, and she does inexpensive sewing for her friends. Some of these women like to tell me how "Bertha" (not her real name) has much better pricing. I imagine that Bertha does good quality work. But not one of her "friends" tells me that she does beautiful work. Bertha is valuable because she works cheap. I just figured out that the unspoken message here is that these ladies will bring their sewing to me if I'll just cooperate and work even cheaper.
Let's do the math for Bertha's business, assuming she has an actual business where she declares her income to Canada Revenue......
Someone brings her a pair of pants to hem - that's at least 15 minutes for a consult - to discuss what the customer wants, have them try on the pants, and get them pinned accurately. Let's say Bertha can cut, hem, and press that pair of pants in 15 minutes. Let's add another 5 minutes to make an invoice and bag up the garment. Then her customer comes back in to pick up the pants and she collects payment - at least 10 minutes. That's 45 minutes if all goes well. The customer pays her $6. That means Bertha is working for $8 per hour. Once Bertha pays for advertising, shop supplies, insurance, income tax, etc - let's be generous and say Bertha takes home $6. per hour. Minimum wage in Alberta is $9.95. This makes me sad for Bertha.
Certainly we all want to save money. But I have a hard time taking the abuse of older women who think it's a good idea for me to work for less than $6. hour because I am "just sewing a hem".
Do people still view some professions as "just women's work", and therefore not worthy of even minimum wage? Clearly, not every woman knows how to sew a hem, and those that know how don't always want to. So I think my skills are valuable to some. I was just quite shaken to be rebuked pretty harshly by older women, for trying to earn a decent living. I know I am taking this too personally, and it may be just a case of people who like to complain about prices. Perhaps the bullying tactics work some of the time. (There were other things said which I am not mentioning here. These were not nice little grandmas.....)
So, back to my question. Are there certain skills which are perceived as traditional women's work, and therefore should not cost much money? Am I in a profession where I will need to explain my pricing much of the time? Or is my situation common to any business? I'm not sure how to think about this. I realize I need to develop a thicker skin, because not everyone is polite. But why do older women, who I think ought to know better, push another women to work for free?
I was going to talk about overseas sweatshops, and the deplorable conditions there, which enable us to buy $7. jeans at Walmart. But perhaps that's not the point. We live in Canada, we have labour laws and a minimum wage. We know that doctors made a certain level of income. We understand that an automotive shop charges a hefty shop rate per hour. We understand that the young person working at McDonalds works for closer to minimum wage. Do we have an expectation that sewing pays less than a fast-food job? Should I explain the value in what I do, or do I politely but firmly end the conversation because this person is never going to be happy paying a fair price?
Let me know what you think, I'd love your feedback.
Encrusted CQ class project

Tuesday, 29 April 2014
Friday, 25 April 2014
Pegboard for the Win!
I am LOVING having pegboard in my shop, it's been really helpful for organizing and storing so many threads, notions, etc. I may paint it in the future, because I've seen some painted pegboard on Pinterest that is really cute. For now, the pale gray works fine with my Shabby Chic sewing room.

** If you're wondering, yes, my dress form is at a strange angle. She's not assembled correctly since I brought her home. I call her ......wait for it..... Aileen!
I have a plastic cutlery tray on my work table, which was much too full. An organizer just doesn't work well if it's stuffed with too many items. It's much easier to grab what I need now:

Now my scissors are hung up, and not getting dulled by rubbing against each other.

My cone thread sits on a rack I bought on our local online Buy and Sell. The pegs are too thick to fit regular small spools of thread, and those spools were getting very tangled sitting in a plastic storage bin. Now they are separated by colour, and live in these cute Easter buckets and baskets, from Dollar Tree. The pastel colors work with my decorating scheme, and each bin was 1.25!


From another dollar store, I bought these white baskets, 2 or 3 for a dollar. On these hangers, they sit at an angle that is perfect for seeing what I have and easily grabbing it. One bin for handsewing tools (thimbles, beeswax, etc), one for tracing wheels, and one is dedicated to bandaids. The last thing you want is to get a minor cut and then bleed on a customer's garment - I have bandaids in a couple of locations in my shop.


And this little corner table was purchased at my very favorite thrift store, Nu2U in Olds, Alberta. I think I paid about $8 for it, and it now holds my pressing tools - tailor's ham, clapper, spray starch, iron cleaner.

My shop is mostly set up and organized, but my new worktable is coming on Thursday. The Olds College fashion program has moved to fancy new digs in Bow Valley College in Calgary. So the sewing tables from the Olds campus are being sold - one of the tables I spent so many hours at in school will be coming to live in my shop. They are huge, and heavy and I am so excited to have a worktable big enough to lay out fabric for cutting. I used to be happy cutting out patterns on the floor, but my body reminds me that I am no longer 20. Cutting pattern pieces at the correct height saves a lot of money in chiropractor bills!
**Update:
Here's my worktable, a whopping 4 by 8 feet! I can get some serious work done now!

** If you're wondering, yes, my dress form is at a strange angle. She's not assembled correctly since I brought her home. I call her ......wait for it..... Aileen!
I have a plastic cutlery tray on my work table, which was much too full. An organizer just doesn't work well if it's stuffed with too many items. It's much easier to grab what I need now:
Now my scissors are hung up, and not getting dulled by rubbing against each other.
My cone thread sits on a rack I bought on our local online Buy and Sell. The pegs are too thick to fit regular small spools of thread, and those spools were getting very tangled sitting in a plastic storage bin. Now they are separated by colour, and live in these cute Easter buckets and baskets, from Dollar Tree. The pastel colors work with my decorating scheme, and each bin was 1.25!
From another dollar store, I bought these white baskets, 2 or 3 for a dollar. On these hangers, they sit at an angle that is perfect for seeing what I have and easily grabbing it. One bin for handsewing tools (thimbles, beeswax, etc), one for tracing wheels, and one is dedicated to bandaids. The last thing you want is to get a minor cut and then bleed on a customer's garment - I have bandaids in a couple of locations in my shop.
And this little corner table was purchased at my very favorite thrift store, Nu2U in Olds, Alberta. I think I paid about $8 for it, and it now holds my pressing tools - tailor's ham, clapper, spray starch, iron cleaner.
My shop is mostly set up and organized, but my new worktable is coming on Thursday. The Olds College fashion program has moved to fancy new digs in Bow Valley College in Calgary. So the sewing tables from the Olds campus are being sold - one of the tables I spent so many hours at in school will be coming to live in my shop. They are huge, and heavy and I am so excited to have a worktable big enough to lay out fabric for cutting. I used to be happy cutting out patterns on the floor, but my body reminds me that I am no longer 20. Cutting pattern pieces at the correct height saves a lot of money in chiropractor bills!
**Update:
Here's my worktable, a whopping 4 by 8 feet! I can get some serious work done now!
Tuesday, 22 April 2014
A few more projects
Well, spring has arrived in Alberta. Yesterday it was warm enough to do some yard work, so I started in on some of the garden cleanup/preparation tasks. I planted some pansies in the old metal washtub that's in front of my shop. I know I am pushing the season by a month, but I am feeling starved for color, and I couldn't look at the tub of last year's plant corpses any longer. So much nicer to sit at my desk and see a tub of purple, yellow and cream blossoms!
 The wind has picked up, so the flowers are a little blurry, but you get the idea.
What have I been sewing lately? I'm so glad you asked :-)
The baby boom in our church continues, with the arrival of two more wee girls this week. Not twins, two different families. One of the little ones will be receiving this outfit:
 I scrunch-dyed the onesie, and added hand-dyed lace at the neckline and burgundy trim at the wrists. I had made the flower a few weeks ago, but then it was too pale, so out came the Distress Dye....and now it's perfect. And the cupcake skirt is very simple, but that fabric puts it on cuteness overload.
The other little girl is premature, and might be in hospital a little longer, so I think I'll have a bit more time before I need her shower gift to be done. I'm looking at patterns today, and I'm thinking of making a summer dress or a bubble romper.
The next project is a necklace. My friend Jessica W, from my Olds College sewing program, gave me an extra flower she made for her Couture dress project. Electric blue organza, with coral seed beads in the center - very pretty! And since I wanted a necklace to go with some of my blue outfits, I pulled out my blue beads and got stringing. Here is the result - a long necklace to make two or more loops, depending on the look I want. I love how the flower looks among the various shades of seed beads.

The last item to show you today is another "jeans into skirt" project. This time I made the triangle insert by stitching neckties onto a foundation fabric (a piece of an old fitted sheet). I got smart and used small pieces of fusible web to tack the ties in place, because I have learned how slippery those fabrics are. I used machine embroidery to straddle the edges of the ties.


After trimming off the narrow ends of the ties, I came up with this idea, for a baby boy outfit.

I'll be making a pair of cotton pants to go with this, because our church has yet more babies on the way!
What have I been sewing lately? I'm so glad you asked :-)
The baby boom in our church continues, with the arrival of two more wee girls this week. Not twins, two different families. One of the little ones will be receiving this outfit:
The other little girl is premature, and might be in hospital a little longer, so I think I'll have a bit more time before I need her shower gift to be done. I'm looking at patterns today, and I'm thinking of making a summer dress or a bubble romper.
The next project is a necklace. My friend Jessica W, from my Olds College sewing program, gave me an extra flower she made for her Couture dress project. Electric blue organza, with coral seed beads in the center - very pretty! And since I wanted a necklace to go with some of my blue outfits, I pulled out my blue beads and got stringing. Here is the result - a long necklace to make two or more loops, depending on the look I want. I love how the flower looks among the various shades of seed beads.
The last item to show you today is another "jeans into skirt" project. This time I made the triangle insert by stitching neckties onto a foundation fabric (a piece of an old fitted sheet). I got smart and used small pieces of fusible web to tack the ties in place, because I have learned how slippery those fabrics are. I used machine embroidery to straddle the edges of the ties.
After trimming off the narrow ends of the ties, I came up with this idea, for a baby boy outfit.
I'll be making a pair of cotton pants to go with this, because our church has yet more babies on the way!
Thursday, 17 April 2014
Little Girl Bling!
When I saw this little girl's jean jacket at a thrift store, I knew I had to buy it. A burgundy "fur" collar, sparkly denim fabric - how sweet! And I knew it was crying out for even more bling. Here's Burgundy Bling -


 Yoyos, lace, buttons and beads.....I'd say this little jacket has it all.
I'll be back with new projects and ideas and pictures next week. Wishing my readers a blessed Easter!
It's size 4T, and perfect for the little princess in your life! And here are some closeups of what I added:
I'll be back with new projects and ideas and pictures next week. Wishing my readers a blessed Easter!
Tuesday, 15 April 2014
Upcycled Vest
A productive afternoon = another Upcycled Vest! This one started with a black pinstriped woman's vest. Originally from Ricki's, I of course bought it at a thrift store.

I added a line of fuschia velvet ribbon that goes over one shoulder. To this, I stitched handmade fabric flowers, embroidered wool felt leaves, and "vintage pearl" beads. The beads were from a broken necklace bought at a thrift store - an excellent source for older and unusual beads.

So, that's another piece of clothing ready for the craft shows I will do this year. I'm only planning 4 between now and Christmas, but I want to have lots of stock. If the articles don't sell, at least they should draw people in to my table so that I can tell them about my alterations business. And hopefully, I will get a good number of sales as well.


I added a line of fuschia velvet ribbon that goes over one shoulder. To this, I stitched handmade fabric flowers, embroidered wool felt leaves, and "vintage pearl" beads. The beads were from a broken necklace bought at a thrift store - an excellent source for older and unusual beads.
So, that's another piece of clothing ready for the craft shows I will do this year. I'm only planning 4 between now and Christmas, but I want to have lots of stock. If the articles don't sell, at least they should draw people in to my table so that I can tell them about my alterations business. And hopefully, I will get a good number of sales as well.
My next project - finish upcycling a little girl's jean jacket. Another thrift store find that now has some major bling! Stay tuned.....
And, as promised, a picture of the clapper/point presser my Dad made for me. I love it!
Friday, 11 April 2014
Jeans become a skirt
There are many YouTube tutorials on how to make a denim skirt from a pair of jeans. The technique was popular in the sixties, as in these photos:

 I wanted the fabric inserts for my skirt to be more like godets, with extra fullness, something like this:

I had some fabric that was like a soft burlap, which I dyed a fuschia/red colour. It's somewhat sheer fabric, so I added two layers. And here's the skirt with the godets in place.

I just needed to hem the skirt at that point, and of course, I'll be adding some embellishments. :-D These fabric flowers will go along the V shapes. As a side note, because the godets are cut on the bias, after inserting them, I left the fabric extra long and hung the garment overnight. This gives the fabric time to relax, so I can get a more even hem.

And here's the finished skirt, which I plan to wear with my gorgeous cowgirl boots!
Front:

Back:

Boots (with pointy toes, for kicking things in corners)

I'm wearing my long skirt as I speak, and I love it!
The best tutorial I found for the basic jean skirt technique was this -
I had some fabric that was like a soft burlap, which I dyed a fuschia/red colour. It's somewhat sheer fabric, so I added two layers. And here's the skirt with the godets in place.
I just needed to hem the skirt at that point, and of course, I'll be adding some embellishments. :-D These fabric flowers will go along the V shapes. As a side note, because the godets are cut on the bias, after inserting them, I left the fabric extra long and hung the garment overnight. This gives the fabric time to relax, so I can get a more even hem.
And here's the finished skirt, which I plan to wear with my gorgeous cowgirl boots!
Front:
Back:
Boots (with pointy toes, for kicking things in corners)
I'm wearing my long skirt as I speak, and I love it!
Tuesday, 8 April 2014
Personalized Lab Coat
While I was in school, we watched a video of one of the workrooms of a major fashion house.
We were impressed that the sewists in the workroom all wore lab coats. Not only is it a professional look, it helps keep thread off the worker's clothes, and (more importantly) keeps the expensive couture fabric from being damaged. I'm not (yet) the caliber of sewist that works for Chanel or Balenciaga, but I can look just as professional.
I bought my lab coat by mail order, and order a size that was excessively big. As in - huge. Baggy. Stupid big. What was I thinking big.
I shortened the sleeves, took up a large hem, and added a strip of elastic at the back to pull in some of the excess fabric. I added machine embroidery at the sleeves and bottom hem. It's a lab coat with a wearable art twist - professional yet boho. At least I think so :-)


 **Update - After wearing this lab coat, it's still too boxy, so I'm going to add more elastic at the side seams. Altering garments always involves tweaking and changing things until they're just right :-)
We were impressed that the sewists in the workroom all wore lab coats. Not only is it a professional look, it helps keep thread off the worker's clothes, and (more importantly) keeps the expensive couture fabric from being damaged. I'm not (yet) the caliber of sewist that works for Chanel or Balenciaga, but I can look just as professional.
I bought my lab coat by mail order, and order a size that was excessively big. As in - huge. Baggy. Stupid big. What was I thinking big.
I shortened the sleeves, took up a large hem, and added a strip of elastic at the back to pull in some of the excess fabric. I added machine embroidery at the sleeves and bottom hem. It's a lab coat with a wearable art twist - professional yet boho. At least I think so :-)
**Update - After wearing this lab coat, it's still too boxy, so I'm going to add more elastic at the side seams. Altering garments always involves tweaking and changing things until they're just right :-)
Wednesday, 2 April 2014
Mr. Dressup Syndrome
As a fabric artist, I love to collect. I collect new techniques - photo transfer, ruching, beading, dyeing fabric. Whenever I see a new embellishment technique in a magazine, on a garment in a store, or on Pinterest - I feel a very strong urge to try it. That is to say, I obsess about trying it, searching for the least expensive source for materials and pushing aside other projects-in-progress to try to recreate it. It's somewhere between creative genius and mental illness....
Because I love these techniques, and because they require such a wide range of materials, I also collect a wide variety of supplies. I've got fabric, patterns, and threads. I've got beads, buttons and glues. Ribbons, lace and vintage linens all live in my studio. I do most of my collecting at thrift stores, flea markets and discount stores, so there is much less money invested than there could be. But a girl only has so much room to store these things before they take over every empty space. I have discovered I work better when my work table has ONE project on it, and there are some empty spaces in my sewing studio. I don't like a completely empty, Spartan look. But I am much more creative and productive when the room has some empty surfaces and when I can find things easily, without having to dig through layers of stuff.
My system now is to choose an appropriate size of container for each supply - say, an organizer drawer like this for my embroidery threads.
 The Omnigrid ruler is 6" wide, shown as a size reference. These plastic organizers are easy to find at dollar stores or Walmart. And here's what you'd find in the top drawer of this organizer:
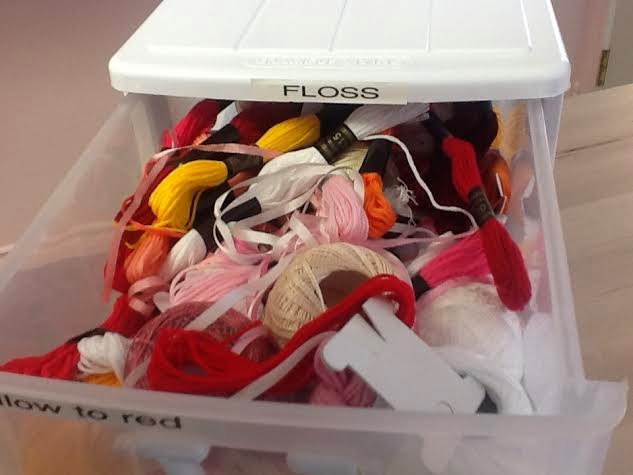 It's a jumble of threads, but it's not overstuffed, and this drawer contains yellows, oranges, reds and pinks. To some people, this is way too many embroidery threads. But it's an amount that works for me. Four skeins of DMC floss isn't enough variety for the kinds of work I do. On the other hand, I don't need to own every color of every weight of every brand of specialty thread. So I use the confines of the container to keep me from overpurchasing. If the drawers are getting too stuffed full, it's time to sort out what I'm not using and give it away. Remember, it's about having the materials to make clothing and art, it's NOT about collecting enough supplies to start your own Michaels store.
Another type of material I collect is what I categorize as "recyclables and junk". Let me explain - when our kids were small, they loved to watch Mr. Dressup. Hey, I watched him when I was small. Ernie Coombs was a wonderful children's entertainer, and also a talented artist.

By the time our kids watched the show, there was a growing emphasis on "reduce, reuse, recycle". Craft projects were created to show ways to reuse egg cartons, bottle caps, cereal boxes, and the like. So, while we as parents were rinsing out milk jugs before recycling them, there was no way at the time to recycle the plastic cap from said milk jug. Mr. Dressup to the rescue - use those plastic milk lids in fun crafts like these:


Because I love these techniques, and because they require such a wide range of materials, I also collect a wide variety of supplies. I've got fabric, patterns, and threads. I've got beads, buttons and glues. Ribbons, lace and vintage linens all live in my studio. I do most of my collecting at thrift stores, flea markets and discount stores, so there is much less money invested than there could be. But a girl only has so much room to store these things before they take over every empty space. I have discovered I work better when my work table has ONE project on it, and there are some empty spaces in my sewing studio. I don't like a completely empty, Spartan look. But I am much more creative and productive when the room has some empty surfaces and when I can find things easily, without having to dig through layers of stuff.
My system now is to choose an appropriate size of container for each supply - say, an organizer drawer like this for my embroidery threads.
Another type of material I collect is what I categorize as "recyclables and junk". Let me explain - when our kids were small, they loved to watch Mr. Dressup. Hey, I watched him when I was small. Ernie Coombs was a wonderful children's entertainer, and also a talented artist.
By the time our kids watched the show, there was a growing emphasis on "reduce, reuse, recycle". Craft projects were created to show ways to reuse egg cartons, bottle caps, cereal boxes, and the like. So, while we as parents were rinsing out milk jugs before recycling them, there was no way at the time to recycle the plastic cap from said milk jug. Mr. Dressup to the rescue - use those plastic milk lids in fun crafts like these:
After 5 shows a week, over a couple of years, our kids learned to NEVER throw out milk jug caps, paper milk cartons, egg cartons, bottle caps, bits of yarn.....it was like living through the Great Depression. It was wasteful to throw out used tinfoil or little bits of string.....why not make your home into a landfill instead?! I loved doing crafts with my kiddos, but at some point you just want to throw out the garbage without a tiny recycling Nazi trying to rescue tiny bits of detritus.
My husband and I are still affected by what we now call Mr. Dressup Syndrome. Empty jars can be so useful, it's hard to give one away or recycle it. A coffee cup that leaks could be used as a plant pot or a pen cup. I have used old CDs as the base for pincushions, and I use soup can lids or the caps from non-stick cooking spray as circle templates. So, here again, I employ my container strategy. I have one small drawer to hold all the tiny plastic containers, onion bag mesh, and twist ties that I "might need" one day. I can keep whatever will fit in that small drawer. When the drawer is full, I stop collecting, or throw out something to make room for the new object.
So, quilters, sewists and crafters - you know what I am talking about. It's time to pare down your collections of craft supplies, items to recycle, and sewing notions. You'll never live long enough to do all the great projects you find on Pinterest. At some point you need to say "Enough is Enough"! Go through your collections and sell the extras at a garage sale or online. Give the extras to your local thrift store, day care or kindergarten class. Give your studio some room to breathe, and give yourself some space to work. Don't be like Dory:
Thursday, 27 March 2014
My Father, My Daughter and Me
This fall I asked my Dad and brother to make me one of these:
 A point presser/clapper is an important pressing tool, to help ensure crisp collar points and perfectly pressed seams. They are made of unfinished hardwood, so the steam from the iron penetrates deep into the fabric. Beautiful pressing can take a sewing project from so-so to professional looking. Since I want one of these for my sewing room, and my Dad does beautiful woodworking, I asked him to make me one. Dad and my brother spend time to together every Tuesday evening, doing various wood and metalwork projects in Dad's shop. Also my Dad has been battling multiple cancers for several years, and the thought of having something he made for me that I will handle every day in my shop for many years......you understand.
I will be receiving my clapper in the mail soon, and my Dad emailed me to tell me that it was nearly done. He also told me the history of the wood he used, how it came from a desk used in the old Nanaimo post office (which was replaced by the new post office in the 1960's). So the wood is over 100 years old. I get a tool made by my Dad's hands, and a piece of Nanaimo history all at once. How amazing is that?!
A day or so after receiving the email, I thought about how my Dad wanted me to know the story of the wood he used. I completely understand this, as I remember when and I where I bought all of the pieces of fabric, buttons, and trims I use in sewing projects. Especially when the materials are from old garments or vintage finds from a thrift store, the provenance of the materials is important to me. Their story becomes part of the garment's story.
My birthday was this week, and my daughter brought me a wreath and a pen holder that she made for my sewing room:


She told me the story of how she designed and made them, the design problems along the way, and how she solved those problems. So, I was given a second gift - not just the objects, but also the stories behind them.
My Dad, me, my kids. We understand that the craftsman has a story to tell, and whether it's a designer dress or the wooden tool that helped in the making of the dress; the craftsman's story is a part of what makes it beautiful.
I will be receiving my clapper in the mail soon, and my Dad emailed me to tell me that it was nearly done. He also told me the history of the wood he used, how it came from a desk used in the old Nanaimo post office (which was replaced by the new post office in the 1960's). So the wood is over 100 years old. I get a tool made by my Dad's hands, and a piece of Nanaimo history all at once. How amazing is that?!
A day or so after receiving the email, I thought about how my Dad wanted me to know the story of the wood he used. I completely understand this, as I remember when and I where I bought all of the pieces of fabric, buttons, and trims I use in sewing projects. Especially when the materials are from old garments or vintage finds from a thrift store, the provenance of the materials is important to me. Their story becomes part of the garment's story.
My birthday was this week, and my daughter brought me a wreath and a pen holder that she made for my sewing room:
She told me the story of how she designed and made them, the design problems along the way, and how she solved those problems. So, I was given a second gift - not just the objects, but also the stories behind them.
My Dad, me, my kids. We understand that the craftsman has a story to tell, and whether it's a designer dress or the wooden tool that helped in the making of the dress; the craftsman's story is a part of what makes it beautiful.
Wednesday, 26 March 2014
Organizing my Fabric Stash
I don't know about you, but I seem to have to reorganize my fabric about every 6 months. When I have too much fabric squeezed into one storage space; and I'm pulling and auditioning fabrics for a new project; well, that's a recipe for disaster. And we won't mention the fact that I don't clean up after these forays into the fabric dresser. :-/
Today, I did a reorganize of my fabric, it took less than an hour, and I think this system is actually going to work for me.
After coming home from college, with lots of scraps of fabric, and a bunch of free fabric, I knew I had to sort through and pare down what I had. We all love fabric, but we are only going to use so much. Fabric is meant to be used, not hoarded in a closet or garage. It goes out of style and deteriorates with sunlight, humidity and heat. I needed to get honest about what I was realistically going to use in the next 18 months. I figured if I hadn't used it in 18 months, I probably wasn't going to. Quite a bit of fabric went to our local thrift store, but most of it was in less-than-1-meter pieces. Hopefully a crafter or quilter bought it and is putting it to use.
After Christmas, I put my larger pieces of fabric on cardboard bolts, which until today were leaning against a wall in the studio. The smaller bits got stuffed into my fabric dresser, a well-loved 4 drawer dresser. But things were still in a mess, and the bolts of fabric were in direct sunlight.
Today's solution: All the bolts of fabric got put into a bedroom closet, protected from sunlight, which can rot and fade fabric. Everything else was pulled out of the dresser, sorted into categories, repacked neatly and the drawers were labelled. My categories were knits, silk scraps, garments for upcycling and Christmas. All the other fabrics were sorted by color - blues/greens, red/pinks/purple, black/brown/silver, white/ivory. Multiple categories went into each drawer, and the dresser is now roomy and organized. No, that doesn't mean I can go buy more stuff! Sorting my sewing supplies always reminds me of my good intentions to make garments, and I realize how many projects I already have on the go or in the planning stages. I've got a gracious plenty - not a gross excess, just enough to keep me busy for the time being.
Not bad for less than an hour's work!
Friday, 21 March 2014
Crafts and sewing on the Internet
After a few days of busy-ness, getting things ready to open my business, I took Saturday as a "play day". I'm creating a few quick and easy projects, while watching Youtube videos for further inspiration. I thought you might be interested in some of the Youtube channels I watch, for sewing ideas and techniques.

This is a link to a youtube video on making shabby chic fabric flowers. Now I want to make these in cotton, cheesecloth, burlap....all tea-dyed and lovely....sigh....
http://www.youtube.com/watch?v=DNnYMpqo2vw
Debbie Shore has lots of videos on sewing, including this tour of her sewing room.
http://www.youtube.com/watch?v=y4xtvZ2IHW4
Niler Taylor's YouTube channel has lots of great sewing videos. I really enjoyed this video, on pricing your sewing and craft items for sale.
http://www.youtube.com/watch?v=h6Df-IW_CJY&list=LLBSJlNRoOx1qU3MaG5sDEsQ
And finally, a link to a video from Nancy Zieman of Nancy's Notions. She's been in business a long time, and she's the best. This one's about layout and cutting of sewing patterns.
http://www.nancysnotions.com/category/video+demos/successful+pattern+layout.do?extid=140308&code=141337-5700

Happy Sewing and Crafting!
This is a link to a youtube video on making shabby chic fabric flowers. Now I want to make these in cotton, cheesecloth, burlap....all tea-dyed and lovely....sigh....
http://www.youtube.com/watch?v=DNnYMpqo2vw
Debbie Shore has lots of videos on sewing, including this tour of her sewing room.
http://www.youtube.com/watch?v=y4xtvZ2IHW4
Niler Taylor's YouTube channel has lots of great sewing videos. I really enjoyed this video, on pricing your sewing and craft items for sale.
http://www.youtube.com/watch?v=h6Df-IW_CJY&list=LLBSJlNRoOx1qU3MaG5sDEsQ
And finally, a link to a video from Nancy Zieman of Nancy's Notions. She's been in business a long time, and she's the best. This one's about layout and cutting of sewing patterns.
http://www.nancysnotions.com/category/video+demos/successful+pattern+layout.do?extid=140308&code=141337-5700
Happy Sewing and Crafting!
Thursday, 20 March 2014
Blog Giveaway - We Have A Winner!
The winner of the pink crazy quilt panel is.....Susan H! Susan, I will private message you for your mailing address, and this beauty will be on it's way to you!
Thank you everyone, for entering. I plan more giveaways in the coming months, because this was so fun!
As I was deconstructing a pink satin blouse today, I found a tiny "spare" button in the side seam. It looked so cute, hiding in that seam allowance, that I had to take a picture. It's a pink shell button, and well, it just made me smile.
 Enjoy the first day of spring, and hope you are not watching snow fall, like SOME OF US are :-)
Thank you everyone, for entering. I plan more giveaways in the coming months, because this was so fun!
As I was deconstructing a pink satin blouse today, I found a tiny "spare" button in the side seam. It looked so cute, hiding in that seam allowance, that I had to take a picture. It's a pink shell button, and well, it just made me smile.
Tuesday, 18 March 2014
Fabric to Dye For
Sunday was another "play day", dyeing and painting small pieces of fabric. Most of these are done just to play with colors and techniques, so I don't have a particular project in mind for them.
On the left of this photo is a lavender commercial fabric that I overpainted using a gelatin monoprinting plate and freezer paper shapes as a resist. For more information about gelatin monoprinting, check out this YouTube video:
https://www.youtube.com/watch?v=dvr6YqyyfUY
The fabrics on the right started out as unbleached muslin. I had previously dyed them, but they didn't have enough color, so I overpainted them with the same gelatin plate technique. The paints in all three of these are Pebeo Setacolor Transparent paints.

 There were a few other fabrics which were "ugly doggies". If you'd like to see them.....oops, the garbage truck just left, never mind.
My prize piece of dyed and painted fabric from today started life as a quilted cotton window valance. I forgot to take a picture of it before I started, but you can see it in the left hand side of this photo. It was quilted ivory cotton with some subtle flower embroidery, and a line of green piping. My first plan was to use it as a curtain on one of my work tables, to hide the storage underneath. But it didn't fit, so then I thought this fabric would make a great tote bag. It just needed a little color.
 I started by dyeing the piece a mottled yellow color. I knew that this thing would soak up a lot of paint if it was just painted, and that it would end up stiff and crunchy. Paint sits on the surface of fabric, dye bonds to the fibers. After dyeing, I add some big dots of Distress Stains, and stamped on shapes with Setacolor Transparent paint.


 Now this piece is looking better. Some ivory is still showing, but there's lemon yellow, peaches, and pinks. But what else could I add?

I draped a piece of red crinoline netting over the left side of the piece so show how that could add some richness to the color. It's sparkly netting too, and hey, sparkles are never a bad idea!
This piece is not done yet. I find this kind of layering works best if I add a layer or two, then leave the piece somewhere visible for a few days or weeks. The ideas flow as I add and look, think, then add some more.
One last photo - the original fabric was purchased for an ocean-themed crazy quilt I've been working on for 5 years. This is known as a WISP, work in slow progress. I loved the fabric, but the orange color was too overpowering. The quilt blocks (diamonds) are all in greens, blues and purples, so orange just pops out and screams LOOK AT ME! How rude, you orange fabric :-) Here's what happens when you overdye with splotches of Chipped Sapphire Distress Stain and diluted Turquoise Setacolor paint:

On the left of this photo is a lavender commercial fabric that I overpainted using a gelatin monoprinting plate and freezer paper shapes as a resist. For more information about gelatin monoprinting, check out this YouTube video:
https://www.youtube.com/watch?v=dvr6YqyyfUY
The fabrics on the right started out as unbleached muslin. I had previously dyed them, but they didn't have enough color, so I overpainted them with the same gelatin plate technique. The paints in all three of these are Pebeo Setacolor Transparent paints.
The next two fabrics don't really thrill me yet, but could work if I add more layers of paint or dye, or as base fabrics with embellishments on top (buttons, beads, couched threads). I'll keep these as future possibilities.
My prize piece of dyed and painted fabric from today started life as a quilted cotton window valance. I forgot to take a picture of it before I started, but you can see it in the left hand side of this photo. It was quilted ivory cotton with some subtle flower embroidery, and a line of green piping. My first plan was to use it as a curtain on one of my work tables, to hide the storage underneath. But it didn't fit, so then I thought this fabric would make a great tote bag. It just needed a little color.
I draped a piece of red crinoline netting over the left side of the piece so show how that could add some richness to the color. It's sparkly netting too, and hey, sparkles are never a bad idea!
This piece is not done yet. I find this kind of layering works best if I add a layer or two, then leave the piece somewhere visible for a few days or weeks. The ideas flow as I add and look, think, then add some more.
One last photo - the original fabric was purchased for an ocean-themed crazy quilt I've been working on for 5 years. This is known as a WISP, work in slow progress. I loved the fabric, but the orange color was too overpowering. The quilt blocks (diamonds) are all in greens, blues and purples, so orange just pops out and screams LOOK AT ME! How rude, you orange fabric :-) Here's what happens when you overdye with splotches of Chipped Sapphire Distress Stain and diluted Turquoise Setacolor paint:
The overdyed fabric is much easier to work with now, with the orange under control.
Dyeing and painting fabric was a relaxing way to spend an afternoon, with no deadlines and no expectations.
Subscribe to:
Posts (Atom)