Encrusted CQ class project

Encrusted CQ class project

Wednesday, 2 April 2014

Mr. Dressup Syndrome

As a fabric artist, I love to collect.  I collect new techniques - photo transfer, ruching, beading, dyeing fabric.  Whenever I see a new embellishment technique in a magazine, on a garment in a store, or on Pinterest - I feel a very strong urge to try it.  That is to say, I obsess about trying it, searching for the least expensive source for materials and pushing aside other projects-in-progress to try to recreate it.  It's somewhere between creative genius and mental illness....

Because I love these techniques, and because they require such a wide range of materials, I also collect a wide variety of supplies.  I've got fabric, patterns, and threads.  I've got beads, buttons and glues.  Ribbons, lace and vintage linens all live in my studio.  I do most of my collecting at thrift stores, flea markets and discount stores, so there is much less money invested than there could be.  But a girl only has so much room to store these things before they take over every empty space.  I have discovered I work better when my work table has ONE project on it, and there are some empty spaces in my sewing studio.  I don't like a completely empty, Spartan look.  But I am much more creative and productive when the room has some empty surfaces and when I can find things easily, without having to dig through layers of stuff.

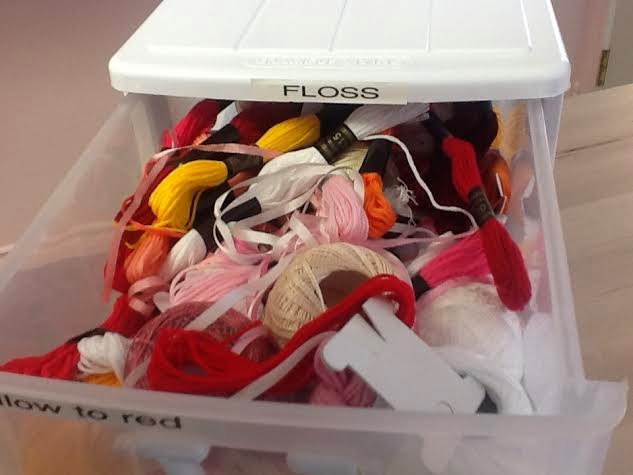
My system now is to choose an appropriate size of container for each supply - say, an organizer drawer like this for my embroidery threads. 

 The Omnigrid ruler is 6" wide, shown as a size reference.  These plastic organizers are easy to find at dollar stores or Walmart.  And here's what you'd find in the top drawer of this organizer:

It's a jumble of threads, but it's not overstuffed, and this drawer contains yellows, oranges, reds and pinks.  To some people, this is way too many embroidery threads.  But it's an amount that works for me.  Four skeins of DMC floss isn't enough variety for the kinds of work I do.  On the other hand, I don't need to own every color of every weight of every brand of specialty thread.  So I use the confines of the container to keep me from overpurchasing.  If the drawers are getting too stuffed full, it's time to sort out what I'm not using and give it away.  Remember, it's about having the materials to make clothing and art, it's NOT about collecting enough supplies to start your own Michaels store.

Another type of material I collect is what I categorize as "recyclables and junk".   Let me explain - when our kids were small, they loved to watch Mr. Dressup.  Hey, I watched him when I was small.  Ernie Coombs was a wonderful children's entertainer, and also a talented artist. 


By the time our kids watched the show, there was a growing emphasis on "reduce, reuse, recycle".  Craft projects were created to show ways to reuse egg cartons, bottle caps, cereal boxes, and the like.  So, while we as parents were rinsing out milk jugs before recycling them, there was no way at the time to recycle the plastic cap from said milk jug.  Mr. Dressup to the rescue - use those plastic milk lids in fun crafts like these:


After 5 shows a week, over a couple of years, our kids learned to NEVER throw out milk jug caps, paper milk cartons, egg cartons, bottle caps, bits of yarn.....it was like living through the Great Depression.  It was wasteful to throw out used tinfoil or little bits of string.....why not make your home into a landfill instead?!  I loved doing crafts with my kiddos, but at some point you just want to throw out the garbage without a tiny recycling Nazi trying to rescue tiny bits of detritus.
 
My husband and I are still affected by what we now call Mr. Dressup Syndrome.  Empty jars can be so useful, it's hard to give one away or recycle it.  A coffee cup that leaks could be used as a plant pot or a pen cup.  I have used old CDs as the base for pincushions, and I use soup can lids or the caps from non-stick cooking spray as circle templates.  So, here again, I employ my container strategy.  I have one small drawer to hold all the tiny plastic containers, onion bag mesh, and twist ties that I "might need" one day.  I can keep whatever will fit in that small drawer. When the drawer is full, I stop collecting, or throw out something to make room for the new object.
 
So, quilters, sewists and crafters - you know what I am talking about.  It's time to pare down your collections of craft supplies, items to recycle, and sewing notions.  You'll never live long enough to do all the great projects you find on Pinterest.  At some point you need to say "Enough is Enough"!  Go through your collections and sell the extras at a garage sale or online.  Give the extras to your local thrift store, day care or kindergarten class.  Give your studio some room to breathe, and give yourself some space to work.  Don't be like Dory:


Thursday, 27 March 2014

My Father, My Daughter and Me

This fall I asked my Dad and brother to make me one of these:

A point presser/clapper is an important pressing tool, to help ensure crisp collar points and perfectly pressed seams.  They are made of unfinished hardwood, so the steam from the iron penetrates deep into the fabric. Beautiful pressing can take a sewing project from so-so to professional looking. Since I want one of these for my sewing room, and my Dad does beautiful woodworking, I asked him to make me one. Dad and my brother spend time to together every Tuesday evening, doing various wood and metalwork projects in Dad's shop.  Also my Dad has been battling multiple cancers for several years, and the thought of having something he made for me that I will handle every day in my shop for many years......you understand.

I will be receiving my clapper in the mail soon, and my Dad emailed me to tell me that it was nearly done.  He also told me the history of the wood he used, how it came from a desk used in the old Nanaimo post office (which was replaced by the new post office in the 1960's).  So the wood is over 100 years old.  I get a tool made by my Dad's hands, and a piece of Nanaimo history all at once.  How amazing is that?!

A day or so after receiving the email, I thought about how my Dad wanted me to know the story of the wood he used.  I completely understand this, as I remember when and I where I bought all of the pieces of fabric, buttons, and trims I use in sewing projects.  Especially when the materials are from old garments or vintage finds from a thrift store, the provenance of the materials is important to me.  Their story becomes part of the garment's story.

My birthday was this week, and my daughter brought me a wreath and a pen holder that she made for my sewing room:


She told me the story of how she designed and made them, the design problems along the way, and how she solved those problems.  So, I was given a second gift - not just the objects, but also the stories behind them. 

My Dad, me, my kids.  We understand that the craftsman has a story to tell, and whether it's a designer dress or the wooden tool that helped in the making of the dress; the craftsman's story is a part of what makes it beautiful. 

Wednesday, 26 March 2014

Organizing my Fabric Stash

I don't know about you, but I seem to have to reorganize my fabric about every 6 months.  When I have too much fabric squeezed into one storage space; and I'm pulling and auditioning fabrics for a new project; well, that's a recipe for disaster.  And we won't mention the fact that I don't clean up after these forays into the fabric dresser.  :-/

Today, I did a reorganize of my fabric, it took less than an hour, and I think this system is actually going to work for me.

After coming home from college, with lots of scraps of fabric, and a bunch of free fabric, I knew I had to sort through and pare down what I had.  We all love fabric, but we are only going to use so much.  Fabric is meant to be used, not hoarded in a closet or garage.  It goes out of style and deteriorates with sunlight, humidity and heat.  I needed to get honest about what I was realistically going to use in the next 18 months.  I figured if I hadn't used it in 18 months, I probably wasn't going to.  Quite a bit of fabric went to our local thrift store, but most of it was in less-than-1-meter pieces.  Hopefully a crafter or quilter bought it and is putting it to use.

After Christmas, I put my larger pieces of fabric on cardboard bolts, which until today were leaning against a wall in the studio. The smaller bits got stuffed into my fabric dresser, a well-loved 4 drawer dresser.  But things were still in a mess, and the bolts of fabric were in direct sunlight.

Today's solution:  All the bolts of fabric got put into a bedroom closet, protected from sunlight, which can rot and fade fabric.  Everything else was pulled out of the dresser, sorted into categories, repacked neatly and the drawers were labelled.  My categories were knits, silk scraps, garments for upcycling and Christmas.  All the other fabrics were sorted by color - blues/greens, red/pinks/purple, black/brown/silver, white/ivory.  Multiple categories went into each drawer, and the dresser is now roomy and organized.  No, that doesn't mean I can go buy more stuff!  Sorting my sewing supplies always reminds me of my good intentions to make garments, and I realize how many projects I already have on the go or in the planning stages.  I've got a gracious plenty - not a gross excess, just enough to keep me busy for the time being.

Not bad for less than an hour's work!


Friday, 21 March 2014

Crafts and sewing on the Internet

After a few days of busy-ness, getting things ready to open my business, I took Saturday as a "play day".  I'm creating a few quick and easy projects, while watching Youtube videos for further inspiration.  I thought you might be interested in some of the Youtube channels I watch, for sewing ideas and techniques.


This is a link to a youtube video on making shabby chic fabric flowers.  Now I want to make these in cotton, cheesecloth, burlap....all tea-dyed and lovely....sigh....
http://www.youtube.com/watch?v=DNnYMpqo2vw


Debbie Shore has lots of videos on sewing, including this tour of her sewing room.
http://www.youtube.com/watch?v=y4xtvZ2IHW4


Niler Taylor's YouTube channel has lots of great sewing videos.  I really enjoyed this video, on pricing your sewing and craft items for sale.

http://www.youtube.com/watch?v=h6Df-IW_CJY&list=LLBSJlNRoOx1qU3MaG5sDEsQ


And finally, a link to a video from Nancy Zieman of Nancy's Notions.  She's been in business a long time, and she's the best.  This one's about layout and cutting of sewing patterns.

http://www.nancysnotions.com/category/video+demos/successful+pattern+layout.do?extid=140308&code=141337-5700


Happy Sewing and Crafting!

Thursday, 20 March 2014

Blog Giveaway - We Have A Winner!

The winner of the pink crazy quilt panel is.....Susan H! Susan, I will private message you for your mailing address, and this beauty will be on it's way to you!

Thank you everyone, for entering.  I plan more giveaways in the coming months, because this was so fun!

As I was deconstructing a pink satin blouse today, I found a tiny "spare" button in the side seam.  It looked so cute, hiding in that seam allowance, that I had to take a picture.  It's a pink shell button, and well, it just made me smile.

Enjoy the first day of spring, and hope you are not watching snow fall, like SOME OF US are :-)

Tuesday, 18 March 2014

Fabric to Dye For

Sunday was another "play day", dyeing and painting small pieces of fabric.  Most of these are done just to play with colors and techniques, so I don't have a particular project in mind for them.

On the left of this photo is a lavender commercial fabric that I overpainted using a gelatin monoprinting plate and freezer paper shapes as a resist.  For more information about gelatin monoprinting, check out this YouTube video:
https://www.youtube.com/watch?v=dvr6YqyyfUY

The fabrics on the right started out as unbleached muslin.  I had previously dyed them, but they didn't have enough color, so I overpainted them with the same gelatin plate technique.  The paints in all three of these are Pebeo Setacolor Transparent paints.
The next two fabrics don't really thrill me yet, but could work if I add more layers of paint or dye, or as base fabrics with embellishments on top (buttons, beads, couched threads).  I'll keep these as future possibilities.
There were a few other fabrics which were "ugly doggies".  If you'd like to see them.....oops, the garbage truck just left, never mind.

My prize piece of dyed and painted fabric from today started life as a quilted cotton window valance. I forgot to take a picture of it before I started, but you can see it in the left hand side of this photo.  It was quilted ivory cotton with some subtle flower embroidery, and a line of green piping.  My first plan was to use it as a curtain on one of my work tables, to hide the storage underneath.  But it didn't fit, so then I thought this fabric would make a great tote bag.  It just needed a little color.
 

I started by dyeing the piece a mottled yellow color.  I knew that this thing would soak up a lot of paint if it was just painted, and that it would end up stiff and crunchy.  Paint sits on the surface of fabric, dye bonds to the fibers.  After dyeing, I add some big dots of Distress Stains, and stamped on shapes with Setacolor Transparent paint.


Now this piece is looking better.  Some ivory is still showing, but there's lemon yellow, peaches, and pinks.  But what else could I add?


I draped a piece of red crinoline netting over the left side of the piece so show how that could add some richness to the color.  It's sparkly netting too, and hey, sparkles are never a bad idea!

This piece is not done yet.  I find this kind of layering works best if I add a layer or two, then leave the piece somewhere visible for a few days or weeks.  The ideas flow as I add and look, think, then add some more.

One last photo - the original fabric was purchased for an ocean-themed crazy quilt I've been working on for 5 years.  This is known as a WISP, work in slow progress.  I loved the fabric, but the orange color was too overpowering.  The quilt blocks (diamonds) are all in greens, blues and purples, so orange just pops out and screams LOOK AT ME!  How rude, you orange fabric :-)  Here's what happens when you overdye with splotches of Chipped Sapphire Distress Stain and diluted Turquoise Setacolor paint:
The overdyed fabric is much easier to work with now, with the orange under control.
 
Dyeing and painting fabric was a relaxing way to spend an afternoon, with no deadlines and no expectations.

Friday, 14 March 2014

Earring Holder

Looking at Pinterest this week, I found a tutorial for an earring holder.  It looked quick and easy, so I gave it a try.

Here's the link to the excellent tutorial -

http://www.delightfullydiy.com/2013/03/quick-earring-storage.html

I bought a gift box at the Dollar store for $3, and I only used the lid for this project.  The bottom of the box will be another handy storage container in my studio.  I used 6 pencils I had on hand, and bought 6 pieces of craft felt for $3.  So, for $6, I had the materials for this project and a bit more.

And here's the finished earring holder.  My earring collection is not huge (I have to wear silver or gold), but it's still easier to find what I need when it's not all jumbled in a dish.  I like the way this looks on my dresser!