Encrusted CQ class project

Encrusted CQ class project

Friday, 14 March 2014

Earring Holder

Looking at Pinterest this week, I found a tutorial for an earring holder.  It looked quick and easy, so I gave it a try.

Here's the link to the excellent tutorial -

http://www.delightfullydiy.com/2013/03/quick-earring-storage.html

I bought a gift box at the Dollar store for $3, and I only used the lid for this project.  The bottom of the box will be another handy storage container in my studio.  I used 6 pencils I had on hand, and bought 6 pieces of craft felt for $3.  So, for $6, I had the materials for this project and a bit more.

And here's the finished earring holder.  My earring collection is not huge (I have to wear silver or gold), but it's still easier to find what I need when it's not all jumbled in a dish.  I like the way this looks on my dresser!


Wednesday, 12 March 2014

Well, Hello Doily!

I popped into my local thrift store today and found a bag of doilies for $3.  I wasn't sure how many were in there, or what condition they were in, but I can use even damaged textiles in my work.  So I bought the bag.

Imagine my excitement to find 12 doilies, in perfect condition! 
At first I felt a little sad that each piece of handwork, lovingly made by an unknown woman, had sold for 25 cents each.  But I feel happy again knowing that I am not merely collecting these to sit in a drawer.  They will be added to
crazy quilt blocks, jean jackets and other wearable art.

Don't forget to enter my giveaway, to be drawn March 20.  Leave a comment on the March 7th post to enter!

Monday, 10 March 2014

St Paddy's Day Quick Project

This weekend was the time for a quick and fun project - a pin for St. Patrick's Day!

This was my inspiration - a pin I made for Canada Day a couple of years ago.  This pin is waaaaay too big, almost 5-1/2" across, so I took it apart and made a smaller version.


Using the same technique, I made a shamrock pin for St. Paddy's Day.  I could have looked on Google images for "line drawing shamrock" to get the shape and size I wanted for a pattern.  But then I found some shamrock stickers at the dollar store, which I used as the front of the pin and for a pattern for the stabilizer and backing.  Here are the supplies:

 
Sorry about the glare on the package of stickers....  From the left, a package of sparkly fun foam stickers from the dollar store; a bunch of buttons; several kinds of beads/sequins; black Peltex, a very firm stabilizer; a sew-on brooch back; green wool felt; embroidery thread.  IMNTBHO (In my never-to-be-humble opinion), wool felt is the only kind of felt to use.  So nice to work with, such beautiful rich colors, and much better coverage than thin and scratchy "craft felt".  I buy wool felt squares at www.joggles.com , which is also an excellent source for beads, threads, and other goodies.  Joggles has inexpensive and fast shipping, high-quality products, and very helpful people.  Be sure to check out their online tutorials, for dozens of techniques and projects.
 
To make the pin, I put a sticker on the Peltex, using it as a pattern.  Then I trimmed down the stabilizer, so the black wouldn't show through to the front of the pin.  You can see that the glitter from the sticker migrated to the backing; and yes; it was all over my work surface, hands, clothes...
 
Then keeping the Peltex and the sticker as one unit, I stitched on buttons, applying the biggest ones first and filling in with smaller buttons and finally beads.  Buttons with shanks are good to fill in small gaps, as only the shank needs to fit in the gap, and the button face sits on top. Because my base is a sparkly sticker, I wasn't too concerned about filling in every millimeter of the pin face.  With the Peltex adding stiffness and supporting the weight, you could really encrust these pins with multiple layers of embellishments. 
 
Here's the almost-finished pin, just waiting to be assembled.
I used another sticker as a pattern to carefully and exactly cut out green felt for the back.  I sewed the bar pin on the felt backing, and glued the units wrong sides together. I used Aleene's Tacky glue, applied lightly with a paintbrush, and used clothespins to clamp it until it dried.  This was a fun afternoon project, and I wore the pin on a blazer to church yesterday.  It made a couple of people smile, but especially me!


Friday, 7 March 2014

It's Time For A Giveaway!

As I continue unpacking boxes and setting up my Sewing Room, I have found a few things that I just don't know what to do with. This piece is from a Crazy Quilt Round Robin I participated in two years ago. I did the fabric piecing and some of the embellishments, and then three other ladies in the USA took turns working on it. It measures 44 cm wide x 33cm high (17 x 13 inches).


Here are some close ups to show the embroidery buttons, beads and other bits of happiness. 


I could have framed this as a piece of art, stitched it to the front of a tote bag, made it into a cushion....but I haven't so far. And I know my UFO (unfinished objects) pile is much too large. So I'm going to give away this piece of pink lusciousness to one of my readers!

I'll make a random drawing of any entries sent it by March 20. To enter just leave your name in the comments below. I'll use a highly technical method to determine the winner (involving slips of paper and a hat), and then I'll pop this baby in the mail!  

Thursday, 6 March 2014

Jean Jacket - The Big Reveal!

It's done, it's done!  I am so excited about this jacket, I just wish the weather would warm up enough that I only needed a jean jacket to go outside.  This past weekend was "fur hat, heavy parka and thick gloves" weather.  No wonder this jacket is now in spring colors - I am SO ready for winter to be over!!  But I digress.....on to the jacket...

 Here's the peacock in all his glory.  Because the embellishments on the front were in peaches and pinks, and the peacock is more ivory colored, I wanted to tie together the front and back a little more gracefully.  So I used a button trail, which adds lighter colors to the front, and more of the pinks to the back.

 This picture is sideways, and I can't get it turned the right way up....sorry.  But this shows a close-up of the lace yoke and the front of the button trail.  This is the most accurate representation of the colors.

And, here's the finished jacket front -
I have so many more ideas for upcycled jean jackets, I think my next project will be a jacket for sale. I recently got a pretty jean jacket from a thrift store, much too small for me, but perfect to embellish and sell.

Tuesday, 4 March 2014

Jean Jacket - Part 2

Part 2 of the jean jacket project -

I got this peacock doily at a thrift store (Nu2U in Olds, Alberta - the most awesome thrift store ever!!)  It's a bit worn in places, which I plan to cover up with stitching, or buttons.  I put some small squares of Heat and Bond fusible on the doily (just the lower fabric part), then pinned it to the back of the jacket, before fusing it in place.  I'll use perle cotton to stitch the lace portion to the jacket.

Here is the doily, stitched on and embellished with sequins and beads
 
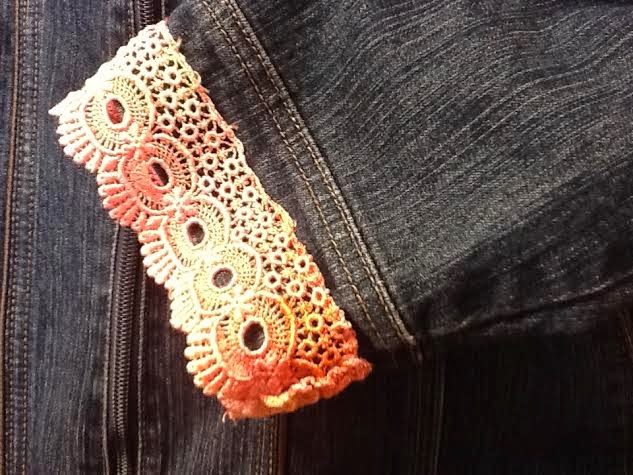
I wanted lace trim at the cuffs and the front yoke, but didn't want it to be stark white.  So I used some Procion dye and had some fun.  My first attempt using the Baby Pink color was a failure...more like the color of a crushed strawberry, not the soft pink I was aiming for.  So I bleached back some of the color.  Because I swished the lace very quickly in a sink of hot, soapy bleach water, the color lifted in a mottled pattern which I really like.  Then after washing and rinsing well, I overdyed the lace with very dilute fuschia Procion dye. Here's how the pieces turned out.


Pale pinks and peaches - aren't these fun?!

And here are the lace cuffs added to the jacket:


Stay tuned for Part Three - the finished jacket! 

Sunday, 2 March 2014

Jean Jacket - Part One

I have a zip-up jean jacket that I want to embellish. I started by hanging the jacket in my sewing room.  It helps to look at a garment for a few days while I'm trying to figure out the design.  


I searched "jean jacket upcycle" on Pinterest to get some inspiration. 
 
I love the lace panel on this, and the way the seamstress cut away the denim underneath it.
This one is similar, with the addition of lace at the front yoke.
Fuschia crushed velvet - so luscious.
Love the lace trim at the bottom, and the layers of several kinds of lace.
This is not the direction I want to go for this project, but I love, love, love the huge double ruffle on this!
 

Okay, this is a journal cover, but I love the layers of lace and ribbon and embellishments. 

Time to rummage through my trims and beads, and to audition them on my jacket.